skip to main |
skip to sidebar
A couple of weeks ago I shared this poodle skirt table topper I made out of felt. This was a total no sew project. I suggested it would be great in a teen's room or little girl's room, but today I am doing a tablescape with it. I found this tissue paper pom pom kit by Martha Stewart at a yard sale. I can't believe how easy these are to do.
My resident baker was unavailable to help me with these cute layer cakes that were Pinterest inspired, so left to fend for myself, they are sort of leaning towers, but I think they are adorable. At least the ones on Pinterest were.
The Paris plates came from Home Goods, and I think the black and white is perfect with this theme. I have had them for a few months and have shared them with you before.
Now, as much as I would love to take credit for this tablescape theme, years ago my friend Judi did a 50's tea party and she used old phonograph records as the charger plates. Cute, huh? Well, I picked up a couple for a dollar a couple of weeks ago and I can't remember where I put them. But if you want to use this idea, the albums were way cute!
My daughter purchased the little poodle picks about a year ago especially for a tablescape theme and I have been hoarding saving them ever since.
The cookies are store bought vanilla wafers that I dipped in pink candy coating. These were so easy and another idea I got off of Pinterest.
How long has it been since you've had a Hostess pink snowball? It's been years for me, but I thought they were so apropos for the occasion.
This was my birthday card from my daughter this year. It was also a perfect accessory for today's table. An invitation like this would be spectacular!
Of course, I had to add some itty-bitty polka dots and some applique pink poodles too. Thanks for stopping by. Help yourself to the cake if you dare. I'm clearly not the baker around here.
I'm partying at...
Mondays Le Chateau des Fleurs The Graphics Fairy
Between Naps on the Porch Metamorphosis Monday
Tuesdays Knick of Time Coastal Charm
Boogie Board Cottage A Stroll Thru Life
Cozy Little House Tweak it Tuesday
Wednesdays Savvy Southern Style
Thursdays The Shabby Creek Cottage No Minimalist Here
Between Naps on the Porch Tablescape Thursday
Rustic Restorations Homespun Happenings
Fridays French Country Cottage My Romantic Home Miss Mustard Seed
Potpourri Friday Common Ground
The Charm of Home Rooted in Thyme
Saturdays Funky Junk Interiors
Sundays My 1928 Charmer Sunday's Best
This blog post is my product review for Modern Masters Crackle Finish. I love to paint signs and old wooden caddies and just about anything small that I can make look really old and weathered. I leave the big stuff to my husband.
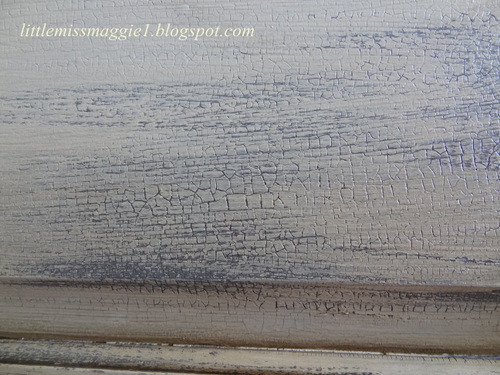
So first I'll start out by telling you I used to be a power seller on Ebay. One of my biggest sellers was petite French night tables that I used to "spot crackle" and I really did an Old World finish on them. I could ship them for $30 anywhere in the country. Then one very sad day the U.S. Postal Service wanted to charge me $70 because the rates had gone up. So I let this little hobby of mine go by the wayside. With my renewed interest in my hand decorated pieces, I have been longing for my porcelain crackle days to return. The bottles of crackle I had on hand which were professional grade had lost their integrity (yes, crackle has a shelf life) and so I went in search of a new product. Enter Modern Masters porcelain crackle. I tried it this weekend on some cabinet doors I am doing a pair of signs on and let me tell you, this product delivers in spades. It's too much crackle for even me, but it did what it was supposed to do so I give it an outstanding A+++++. This was my result in the following photo. With the old professional product I would get just spottings of crackle which is really the look I want. A truly old piece doesn't crackle uniformly like this, but I can adjust for this on future projects.

My husband painted my cabinet doors with a primer gray latex paint, the kind you just brush on. Then I used Step 1. I painted it onto the cabinet doors with a cheap disposable brush. When I say cheap, it's because they can be washed out and reused until they die. This is a water based product so I washed my brush with soap and water and I'll use it again. My 59 cent brush will serve me well.
I brushed the entire front of the doors figuring I would be lucky to get 25% of my door to crackle. This expectation was based on all the other crackle products I have used from the professional ones to the Michael's Craft Store ones. This is a porcelain size crack like the crazing on antique china, not the huge cracks of the 80's refinishing fad.
What causes the product to make a crackle finish is because it's really a glue. So step one is a glue that is painted on and it dries so it's sticky but the glue residue does not come off on your fingers. Now that step one is complete, I have a sticky surface.
Now I used another cheap dry brush. I just didn't want to use the wet one and these steps need to be done within an hour of each other. Step two is a top coat of the water base Step 2 Modern Master's Crackle. This seals in the glue so it's not sticky anymore. I could see the crackle appear on the surface once step two had dried for about an hour. I came back and dry brushed with Annie Sloan's Old Ochre over the cabinet doors. Look at that crackle. Can you see it? Seriously, if you can't, get your eyes checked. Wow, that's a lot of crackle!

We're talking crackle heaven here. Even where I put heavy paint you can still see the crackle. Now there is a step three to this process which I didn't purchase only because I didn't know about it until I read the instructions. One is a dark finish and one is a light finish. I think this is similar to the light and dark waxes we have all been using of late. Since I had to improvise, and honestly I might have done this anyway, I sprayed the surface with Deft clear satin lacquer spray. That is my clear coat of choice. Use whatever clear coat you prefer. Then I took my Minwax Jacobean stain and wiped it on and then wiped it back just to get some dark in the crevices and the cracks. Once this dries (I'll give it 24 hours because it's still 96 degrees here in November!), I'll respray it with the Deft and continue on with the rest of my project. So if you like the fine porcelain cracks of china, you will love this product to age your furniture projects and whatever else you love to do. Thanks for stopping by. I hope I "cracked" you up (lol).

I'm partying at...
Mondays Le Chateau des Fleurs The Graphics Fairy
Between Naps on the Porch Metamorphosis Monday
Tuesdays Knick of Time Coastal Charm
Boogie Board Cottage A Stroll Thru Life
Cozy Little House Tweak it Tuesday
Wednesdays Savvy Southern Style
Thursdays The Shabby Creek Cottage No Minimalist Here
Between Naps on the Porch Tablescape Thursday
Rustic Restorations Homespun Happenings
Fridays French Country Cottage My Romantic Home Miss Mustard Seed
Potpourri Friday Common Ground
The Charm of Home Rooted in Thyme
Saturdays Funky Junk Interiors
Sundays My 1928 Charmer Sunday's Best


.JPG)


