HomeTutorialsHand PaintedTablescapes

Saturday, January 28, 2012

French Garden Caddy

For this project I wanted to use a Graphics Fairy Graphic.  I confess I am not happy with the way it turned out. but nonetheless, I will share it anyway.  I do like the colors, but I seriously need to invest in some new brushes and especially a liner brush.  For what this project is, this will be fine.

I started out with a Pepto Bismol pink caddy that I picked up at the flea market.  I love pink, but this was too strong and didn't scream garden to me.  I painted it with Rustoleum American Accents Colonial Red from the can and brushed it on.  This is suitable for outdoors and that makes it the perfect garden paint.  I then adjusted my graphic on the copy machine to fit the piece.  When I do garden caddies, I do the graphic on both sides in case someone wants to use them for a center piece.  That way it can be seen from both sides. On this project I used tracing paper and traced the pattern.  Because I was truly unhappy with the lettering, I decided to sand it back and make it more primitive.  It's going outside; right?  I always like to add a little embellishment so I added these lady heads.  I found these on Ebay years ago and purchased a lot of 20 medallions.  Unfortunately they are metal and have no give in them so it is hard to affix them to furniture.  In this case though I thought the screws would be fine.  When it was all done, I sealed it with Valspar flat sealer in the spray can.  It says indoor/outdoor so, again, I think it is suitable for an outdoor project.


Funky Junk's Sat Nite SpecialThe Graphics Fairy
Todays Creative BlogHome Stories A2Z

{Primp}


Pin It

Button Button, Who's Got the Button

Is it just me, or does anyone else see the endless possibilities with a garland like this?  Look closer in the bottom photo of how this was done.  I spotted this in my friend Laura's space.  She always brings in true vintage and this is definitely the real deal.  This could be great for a Christmas garland in all whites or silvers or a combo.  Either way this is charming and oh so creative!
 Believe me when I say I am no hand model.  I'm always sticking my hands in things a lady would never venture into, but, after all, that's the job of a DIYer like myself and somebody has to do it.  Right?  At any rate, I wanted to get a close up of how this garland was constructed.  These are flat vintage buttons with a shank on them and the thread was just threaded through with clear small beads in between.  Now see where the buttons look two-sided or back to back?  They simply threaded one button one way and the next button the opposite way and since the buttons are flat they rested against each other.  Some buttons were doubled up and some were not.  Either way, this is a fun sweet little garland, and if I had grandchildren instead of grandkittens, I would let them try a project like this.  It's that easy.  I know my daughters read my blog and I do love my grandkittens, but seriously.
Pin It

Friday, January 27, 2012

Kodak Moments

First let me say how saddened I am about the current state of Kodak.  They are a true American icon and I hope they can reorganize and get back to the top of their game soon.

That said, Sunday I went out to the shop as I usually do on Sunday afternoon, and I noticed a plethora of old cameras in various dealer's spaces so I rounded them all up and photographed them so I could share them with you.  What is it about old cameras?  Do they remind us of the happy times in our lives?  There is truly something nostalgic about them and I can never not buy an old Brownie or any other kind of camera I come across.  Below are some exceptional old cameras.
 The old Kodak display piece is a great advertising piece even though it is weathered and worn.  The camera on the left is exceptional.  It is really an oldie but a goodie.   Sad to say, it is not my camera (because it would not be in the shop, it would be at my home!)  It's definitely a keeper.
 This thing weighs a ton.  I had to get up on the ladder and add the other cameras around it to do the photographing.
Pin It

Thursday, January 26, 2012

Valentine Roses From Book Pages

Are you ready for some glue gun burns?  Cause you're gonna have 'em with these babies.  This is a new twist to the Glitterfest Roses I did in November.  These are red roses in honor of the season.  After all, Valentine's Day is probably the best occasion for florists the entire year.  So here is my rendition of the Red Red Rose.
To start off, I used a large pretty red and white toile paper plate that I had on hand.  Sometimes I pop into Tuesday Morning or Walmart just to see what pretty paper goods they have on hand.  These are the most inexpensive places I have found for paper goods besides the 99 Cent Store, and I like to keep pretty ones on hand in case we want to have a light impromptu snack on the patio.  This one was perfect for my project.  I used one of my custard cups and traced four circles so I could make four roses.  I cut out one of the circles.  This will be the base of your flower.  If you are going to use these for gift ties you can punch holes and string ribbon or use double-sided tape.  I glued the petals onto the white side of the circle so the under side would still be pretty for whatever you use the rose for.
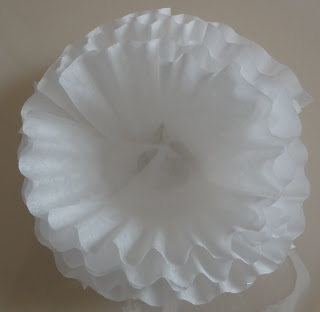
I use a glue gun for this type of project simply because Tacky Glue takes way too long to dry.  For this project I used only the white coffee filters.  Cut them in quarters.  Your first layer will consist of 5 quarters placed in a circle slightly overlapping each other.  Next take 5 more quarters and place them on top of the first row.  Always stagger your petals (quarters) as nature doesn't put any petals one on top of the other.  I also usually work in odd numbers of petals.  3s and 5s work best.
 After you place the second row of petals which consists of 5 petals, now you will do two more layers one on top of the other but this time you will do 3 petals per layer.  Keep slightly overlapping.  If you refer back to my original roses in November I used the brown and the white filters.  Thus the rows had variations of color.  If anyone would like to point me to a tutorial on how to insert the link to my other roses, please feel free to do so (Please, pretty please.  Haven't figured it out yet on my own.)
 Now I cut out my kinda square heart shaped petals from book pages.  They are about 5 inches wide and no longer than the coffee filters.  Refer to my other post.  It's one of my most popular posts so you can probably find it on my side bar.  Continuing on.....sort of pleat the bottom of the petal to get it to curve like a petal would  You will need 5 of these book page petals.  For this layer you are going to pleat the bottoms of 4 of the petals and glue them in place like I did in the picture.  See the glitter bordering the petal?  That is white iridescent glitter.  I did this step with the Tacky Glue ahead of time and let them dry while I was getting the supplies out and gluing the first layers.
 Below you will see for this step I only used 4 petals but I still staggered them a little bit.
 Now for the red.  Last year I purchased these pretty red napkins at a specialty store.  The color was perfect for my application today.  I used my pattern that I used for the book pages.  To describe it a little better, because I forgot to photograph the flat petal, think of it as a heart.with the pointy part cut off.  That will give you the proper shape.
 The red napkin layer rests right on top of the book page layer but remember to stagger it.  Each layer builds upon the other and that's what gives the rose its fullness.  I took the fifth book page petal and rolled it up and glued it in a circle.  I took the bottom half inch of the petal and pressed it flat and glued that part down into the center of all the other layers.  Now it wanted to lean a little bit so I took approximately 6 more white petals aka coffee filter quarters and glued them around the center book page petal.  At this point, to avoid getting glue all over your other already placed petals, point your glue gun down into the flower and then stick the petal in.  Keep going around and around your center petal until you achieve the desired look you want. By the way, I kept a wood skewer on hand to help with stuffing the final petals down into the glue.  Hopefully this will eliminate a few burns.   I have photographed a couple of the finished rose from different angles.  I love these for Valentine's Day.  Happy crafting and if you enjoy my blog, I love followers.  Have a wonderful day!


Today's Creative Blog


Pin It

Wednesday, January 25, 2012

Clock Face Table Parisian Style

This table turned out fabulous.  I can say that because it was done by a fellow dealer.   I wish I could constantly churn out great projects every day, but with a full time job, sharing what other talented people have done brings me great joy and showcases their talents as well as mine.  Debbie downloaded this image from the internet.  She took it to Kinko's and had it blown up.  Then she decopaged it to the table top and covered it with a piece of glass.  Now the image was not a perfect fit so she outlined the edge of the table with black which I think shows off the image beautifully.  Magnifique!

Sorry about the glare.  It's those pesky lights in the shop.  Well, we do want people to be able to see what they are buying so we do leave the lights on for them.
Furniture Feature FridaysFunky Junk's Sat Nite Special


Pin It

Tuesday, January 24, 2012

Valentine's Ideas

Valentine's Day is right around the corner, and I thought I would share a few Valentine's decorations one of our dealers brought in to decorate her space.  These are really cute.
I love the red books she used in her display with the white vase.
 How cute are these two little ones?  I love a touch of glitter for any holiday decoration.  It just sparkles everything up.
 This one reminds me of a pretty Valentine cookie.
This little girl is adorable.  She is affixed to the top of a heart shaped box.  Happy crafting everyone.
Pin It