HomeTutorialsHand PaintedTablescapes

Saturday, February 11, 2012

Le Chien


For some reason I am having a real problem getting my photos the size I want them.  Is anyone else having that problem? 

This week I picked another graphic from the Graphics Fairy.  I knew the moment I saw this dog biscuit label I wanted to use it on something.  Next thing I know I found this old dog carrier.  I believe it's about 40 years old.  The gentleman I purchased it from remembers taking his dog an an airplane in this crate years ago.   For some reason, cages are big sellers at our shop.  Bird cages, rabbit cages, all sorts of cages.  People like to use them to put plants in which this would be great for.  The ends slide up and down.  As I did last week, I surrounded the graphic with black pin striping to show the label off a little better and painted the trim with black and then sanded it back.  I wanted it to be a bit primitive since the graphic was pretty old fashioned.  Also as I did last week, I used the wax paper transfer.  Here are a few hints to make it work for you.

If you are painting on a painted surface, it should be dry and sanded smooth before applying your transfer.  Make sure when you attach your wax paper to the copy paper, you have the waxed side out so that you will be copying onto the wax which will be warm and thus will adhere to your piece.  Also if there are words, be sure to reverse the image so it comes out spelled correctly.


This is how the carrier looked when I got it.  Raw wood.  Not attractive at all.


Here is our precious Cindy.  She says no matter how cute I make this thing, she is not getting into it.  No way, no how!

I am no longer using Google Friends Connect as I understand it is going away soon.  Please follow me on the Linky Followers Button or by email.  Thanks for visiting.

I have also attempted to participate in the blog hop party but am having problems with my margins now.  Not sure why.  So I have to delete the party from my blog.  I have spent a lot of time visiting the other blogs that are linked up and have found some great new blogs.  I will continue to check it out each day that it is going on.


The Graphics Fairy
Furniture Feature FridaysFunky Junk's Sat Nite Special


Pin It

Friday, February 10, 2012

Vintage Valentine Graphics

Before I do today's post, I want to thank Bliss  http://blissranch.blogspot.com/  from the bottom of my heart for making me my very own linky button.  Thank you so much.  I am also using larger text after reading Kim's message.  Her blog is Cheap Chic Home http://cheapchichome.blogspot.com/.  I have worried that my text was too small and now I am convinced it was.  Thanks, Kim. 

I know I promised French Typography this week, but before Valentine's Day slips away, let me share a couple of my own personal treasures from my ephemera collection.

I actually found this beautiful graphic cut this way.  Not sure why it was cut, but I have saved it for years.  It's very old paper and although I have seen similar images, I have not seen this particular one.  The second graphic is a vintage postcard and I actually used this one when I used to sell on Ebay.  My store name was Pocket Full of Roses and this was a great image to use for that.  Then my last image is a magnificent example of my friend Markell's calligraphy.  Would you believe this is her free-hand calligraphy?  She did it for some one's wedding a few years back and she was kind enough to share it with a few of her friends.  I have also saved this for years and will cherish it always.


 Pin It

Thursday, February 9, 2012

Liebster Award

I am a week late in doing this post, but nonetheless I am so honored and humbled.  Last week the Liebster Award was bestowed upon me by Kirby Dunston.  She has a wonderful blog and I love the name of it.  It is Kirb Appeal.  Thanks so much, Kirby.  This is a very special honor and you are so kind to award it to me.

Here is a link to Kirby's blog.  Please stop by and visit her.


Now that this honor has been bestowed upon me, I am awarding it to five more bloggers.  In case you are not familiar with the Liebster Award, it is awarded to new bloggers with 200 or fewer followers.  If you accept the award, you must link back to the blogger who awarded it to you and then pass the award onto another five bloggers.  Liebster is a German word and means "dear one."   FYI, I had a heck of a time making my five choices but I had to narrow it down.

There are so many great bloggers out there and it is very difficult to pick just five, but here are my Liebster nominees. 


Kimberlyhites.blogspot.com authors the above blog.  She has a beautiful blog and great ideas.
Adventures Of Our Fami-Ly

I loved Sarah's topless table project.  I am not sure I would have persevered as she did.  Her blog is Adventures of our Fami-ly.  Click on her link above to visit her.

Bliss Ranch

Bliss has some great projects and a hilarious sense of humor.

Last but not least, these two bloggers do not have blog buttons (neither do I - YET!)  but they are great new bloggers. Outjunking.blogspot.com and Betsy at coastal-colors.blogspot.com.  Outjunking just hit 200 followers but I think she should still be included here.   She is a fellow junker like myself.  Both of these bloggers have some great ideas so please pay them a visit.

All of these bloggers are relatively new.  Please pay them a visit.


 Pin It

Wednesday, February 8, 2012

French Typography

I recently came into possession of several antique invoices.  I have 6 of them from France that are around 90 years old.  I'll be sharing a couple of them per week.  I also purchased a lot of 75 invoices from the U.S. that date from 1920 and before.  I love old typography myself and I'm hoping all you creative types out there can come up with something fun to do with these.  Please let me know if you do.  I would love to see your projects.


 Pin It

Tuesday, February 7, 2012

Giant Finials

When I call these finials giant, I mean giant.  They are three feet tall.  I found them at the flea market a couple of months ago.  The only problem was they had a big metal pipe running through them that stuck out the top and the bottom.  I thought "no problem," I'll just have my husband remove the pipe and I'll add a small decorative finial at the top to finish them off.  Turned out the pipe did not come out.  So new lesson learned.  You can cut galvanized pipe with a hack saw.  Who knew?  Surely not us.  They sat in my husband's workshop for over a month before someone told us what to do to shorten the pipe.  Once that was done (and it was so easy), Steve did finish the tops with these smaller finials just to make them look like giant chess pieces.  I think these would be great outdoors as garden ornaments or on a fireplace hearth.  They are wonderful architectural pieces.  I'm considering these a great find now that they are finished and in  my space.
 This is what they looked like when I got them. You can sort of see the pipe at both ends.  And you know what is weird?  They are not wood either.  They were totally wood grained and even felt like wood.  They are not resin either.  A friend who is very knowledgeable told me in the 60's they were making a kind of wood composite material that had the look and feel of real wood but it was actually faux wood.  In other words, no trees were harmed in the making of these finials.  That's great news.
Pin It

Monday, February 6, 2012

Chalkboard Valentines for the Garden

Years ago I purchased a little garden stake that said "Bee Mine," and I loved that little sign.  Unfortunately when Cindy was a puppy, she liked it too,  just in a different way.  She destroyed it.  She was going through her chewing phase, but I always thought it was so cute to have a little sign to welcome us for Valentine's Day.  I did a couple of ideas with chalkboard paint.  These are little wooden hearts I purchased at the craft store.  I glued them onto Popsicle sticks and tied red and white checked ribbon around them.  These are so easy, they would be a great child's project. They were also very economical to make, around 50 cents a stick.   In the second photo, that is actually a bee.  I just used one that was attached to something else because I was using what I had, but there are some cute bee decorations out there if you can locate them.

Pin It

Saturday, February 4, 2012

French Garden Cabinet

First of all, thanks for everyone's wonderful comments on my posts this week.  I really appreciate your comments.  I also hit another milestone of 50 followers.  Yippee!!!!  Thanks to all of you who made this possible.

For this week's project I have used yet another Graphics Fairy graphic.  Who doesn't love the Graphics Fairy?  This one is based on a garden wreath theme, and her graphic was only the frame and not the lettering.  I decided to stay with the garden theme.  I found this cabinet at the flea market.  It was painted gray, sort of distressed and missing the innards like the shelf.  The gray wasn't doing anything for me so I asked my husband to paint it white so I could sand it back and still have the gray undertone showing through.  I picked out my graphic and then set out to figure out how to transfer my image onto the cabinet.  There are so many transfer methods out there and I have never tried even one of them.  I went to the Graphics Fairy's DIY section and there she enumerates several options.  I settled on the wax paper transfer method that was clearly spelled out by Angela of Unexpected Elegance.  I chose this method because it seemed the easiest and I already had everything on hand that I needed.  She really gave good directions so I will just enumerate a few things here based on my experience.  I wet down the side of my cabinet because Angela got a little darker result when she dampened the board she transferred her image onto.  I guess I wet my cabinet down too much because all I got was a runny mess.  It was easily wiped away and I started over.  Read on and I will explain further what I mean.


The following is a photo of the cabinet painted just plain white.

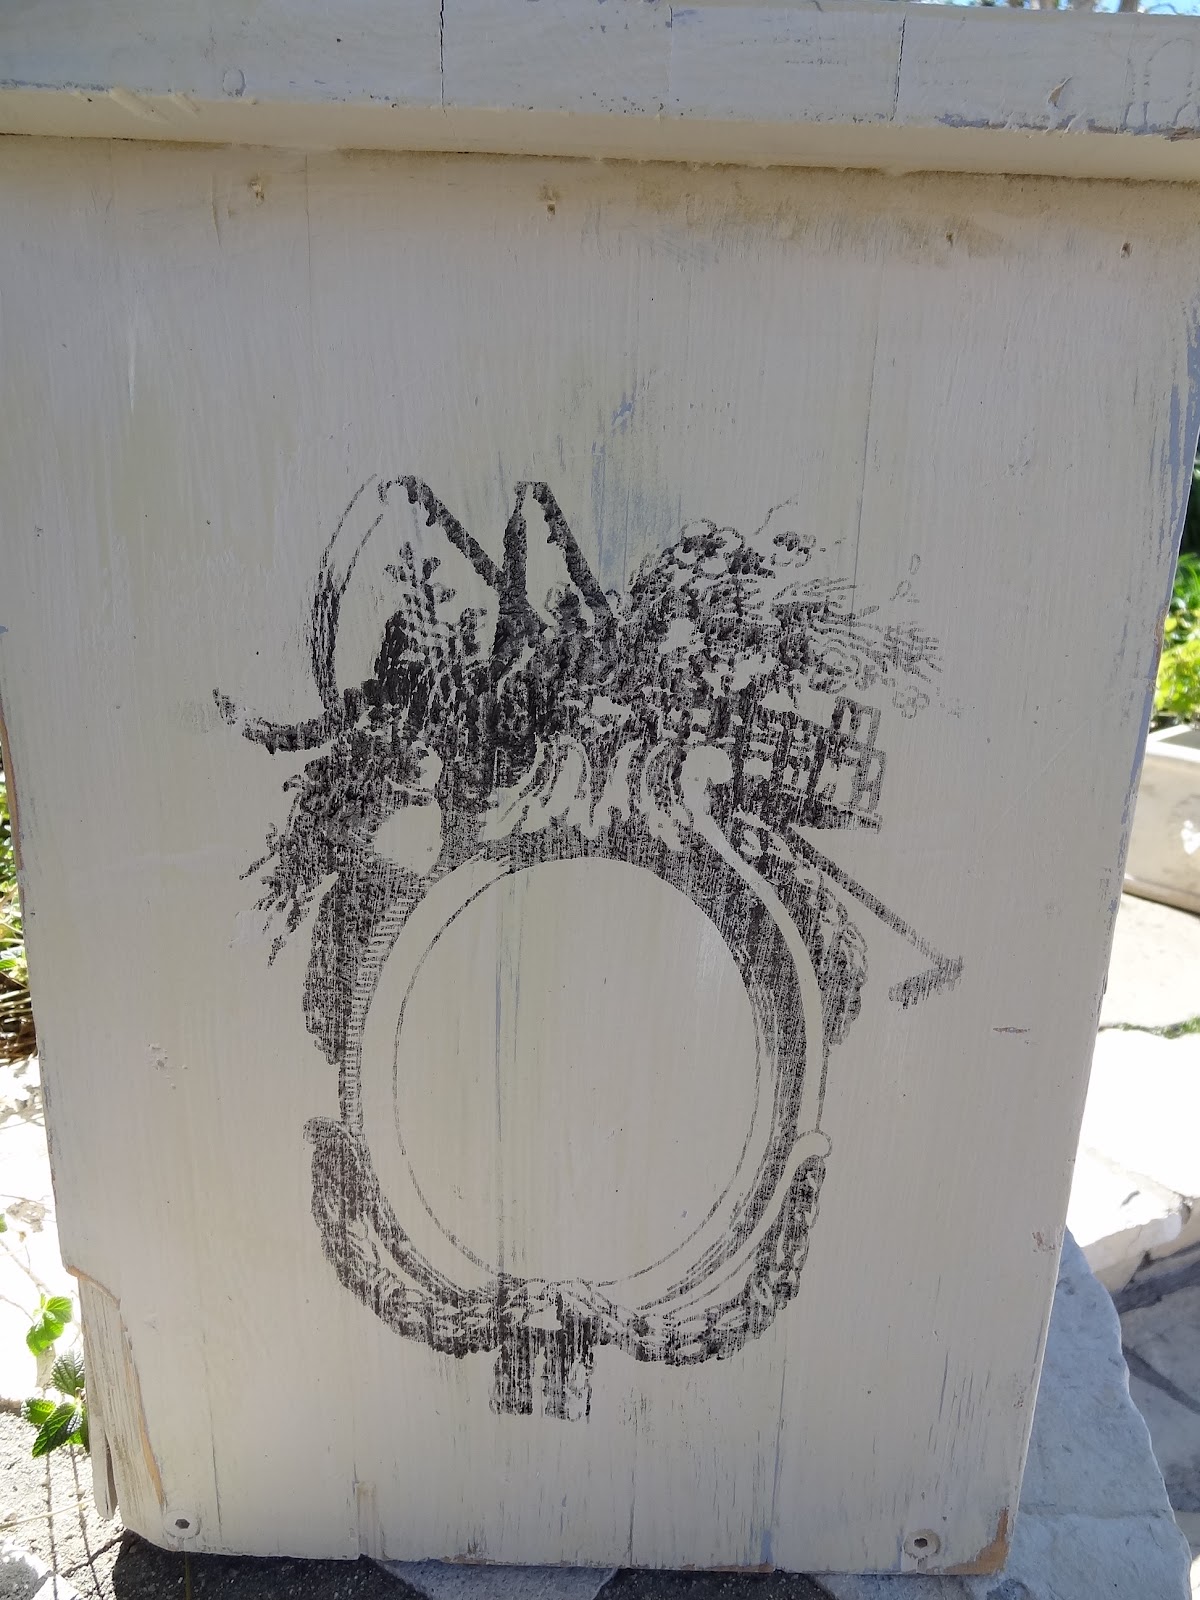
The following photo is transferring the image straight onto the dry cabinet.  I used a credit card just like Angela did and was amazed at the detail I got from the wax paper.  I was able to use my ink jet printer for this and as far as I can tell, no damage was done to the printer from the wax paper.  Many transfer methods don't work with an ink jet printer and that is the only printer I have that is also a copier where I can enlarge and decrease the image size.

It's hard to tell from the photos but this side is the side I had dampened.  By the time I got back to this side the wood was still damp but not overly so.  The image did transfer a little bit darker but not appreciably darker so for me it didn't seem to matter if my wood was damp or not.  Angela's piece was plain woode and not painted.

I did fit the graphic to my cabinet by first enlarging it on my computer and then enlarging it even further with my printer setting to make it as big as I could and yet still fit on an 8 1/2 X 11 sheet of paper.  I used a small stencil I purchased at the craft store.  Nothing fancy about the stencil and it was around $2.50.  This is a great stencil for working in small spaces.  I think the letters are around 3/4 of an inch high.

Next I took my painter's tape and marked out lines to make a box to surround the wreath.  I also did not like all the white on the cabinet when the graphic was so dark so I also painted the edge of the top in the black.  To dull it down so it didn't look like new black, I sanded it and wiped the words down to fade them out even more.  They were about 75 percent dry so the black wiped away nicely and left me a faded image.  Now I never did any wiping on the waxed image.  I left that alone except that I wanted to seal it so it would not rub off so I used Valspar clear spray in the flat finish.  It did seal the waxed surface so now it will not rub off.

This was going to be a two-part posting because I did another experiment today and although I love the way the cabinet turned out, I need to work on this next part some more.  The inside of the cabinet was nothing to write home about.  This is a newer cabinet that was probably made in China and the hardware for the doors was pretty unattractive and I wanted to camoulflage the inside.  I used what is called a reverse stencil.  I laid it on the glass on the inside of the glass door, and I did not get a good contact with the glass.  The stencil has little holes in it so I think you could tack it to a piece of wood, but for the glass all I could do was lay it down.  I sprayed the inside of the cabinet doors with frosted glass spray and where the stencil was it just left the clear glass.  I think I will try another project with contact paper so I get a sharper image next time, but over all I am happy with the results.  This added another dimension to the cabinet and at the same time concealed the mechanics of the door hinges.  In case you are wondering how strong this frosted glass spray really is, I goofed and one of the doors had the image going the wrong way.  I scraped it off with a razor blade and it took some elbow grease to get the frosting off.  Windex alone would not have done it.
Thanks for visiting my blog.  Have a wonderful week.



The Graphics Fairy
Furniture Feature FridaysFunky Junk's Sat Nite Special


Pin It