HomeTutorialsHand PaintedTablescapes

Thursday, September 26, 2013

Fireplace Mantel Mirror and Shelf

I don't have a before photo of this piece, but someone had started stripping it back to oak and soon gave up on the task.  I knew it would be way too much work to finish the job they had started and besides it was already painted a very dark color.
I had my husband sand it down and repaint it black.  Then I sanded it back to expose some of the wood beneath.  I love this finish.  It definitely gives a nice aged look and also a very informal look.
This piece is still pretty primitive, but it's a great accent mirror that makes a huge statement.  It's 45 inches wide and at least three feet tall.  I hope it finds a good home.
Thanks for your visit.

I may be partying at...

Mondays          Le Chateau des Fleurs       The Graphics Fairy  
                                      Between Naps on the Porch Metamorphosis Monday

Tuesdays          Knick of Time       Coastal Charm  
                                      Boogie Board Cottage    A Stroll Thru Life   
                                     Cozy Little House Tweak it Tuesday
Wednesdays     Savvy Southern Style
                                           
Thursdays        The Shabby Creek Cottage    No Minimalist Here 
                                     Between Naps on the Porch Tablescape Thursday    
                                     Rustic Restorations Homespun Happenings
Fridays            French Country Cottage       My Romantic Home        Miss Mustard Seed
                                    Potpourri Friday     Common Ground
                                    The Charm of Home    Rooted in Thyme

Wednesday, September 25, 2013

Selling at the Little French Flea Market

I've been away from my blog for almost two weeks now.  The last time I posted I was getting ready to sell at The Little French Flea Market and it was a very hot weekend registering in the triple digits.
I felt like I nearly melted and it took me at least a week to recover.  Add to that my work schedule and helping with my friend's tea party last weekend, I was left feeling extremely tired and drained.  I'm hoping to get some more energy by visiting with my new grandson this coming weekend.  He just turned three months old and I can't wait to hold him.

To get ready to sell at a weekend event I load my little Toyota truck three times and take two loads on Friday and then another load early Saturday morning before we start.  My goal is to return with only one truck load and that includes all my set up items and my Easy Up and anything that didn't get sold.
You can see in this photo the sun is barely peaking through.  I actually had to wait to arrange everything when it got a little lighter out.  This is just how I left things Friday evening, knowing I would be bringing more.
I finally got my things arranged around 7:00 a.m.
My tea towels and clip boards are always big sellers for me.  I brought a few fall items like my white pumpkins even though it was a scorcher and felt more like summer.  My bench with the French poem debuted this weekend and I'm happy to report it sold.
My green ladder shelf was one of the first things to go as well as my primitive blue cabinet that had that same poem stenciled inside and out.  In fact, anything with my French poem sold.  

I had lots of smalls and lots of frames.  I sold all but one piece of art and all of the small frames sold out.  Even my little folding chairs that we like to sit on sold.  What the heck, I have two more waiting for a makeover, and I love redoing folding chairs.  
In spite of the fact that it was Yom Kippur, a major Jewish holiday in a very Jewish community, the weekend was a huge success.  Our next market will be mid November and I will post the dates as we get closer.  Thanks for visiting and thanks for your patience while I gather my thoughts for the new season.  

Thursday, September 12, 2013

Scripted Vanity Benches

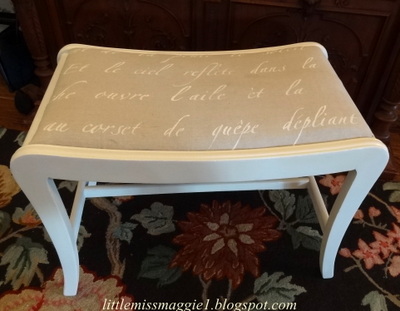
Today I'm posting about two projects that I just finished.  They are both vanity benches and both started out as wood benches.  Well, one of them started out that way.  The first one you see here I think was actually one of those little French side tables that had the round glass in it.  There was no glass, no seat, just the wood frame.  To me it screamed vanity seat.  It got painted and chipped up, had a wood seat made and then I covered it with a scrap of drop cloth that I stenciled my French poem on.  Now it's a shabby little accent piece.
This next piece started out as a bench with a dark wood frame and some dated rose fabric.  I love rose fabric but just not that fabric.  I used the same drop cloth scrap and stenciled the script in white to match the painted frame.  I like them much better with their new update.
It's super easy to stencil on fabric with this French poem stencil from Royal Design Studio.  Just make sure you have a large enough flat surface to support the stencil as it is large.
Both these cute little benches are off to the Little French Flea Market this weekend in Tarzana, California so if you're in the area and you want to come out and sizzle with me, I would love to see you.  It should be a very warm triple digit weekend.
Thanks for stopping by.

I may be partying at...

Mondays          Le Chateau des Fleurs       The Graphics Fairy   
                                      Between Naps on the Porch Metamorphosis Monday

Tuesdays          Knick of Time       Coastal Charm  
                                      Boogie Board Cottage    A Stroll Thru Life   
                                     Cozy Little House Tweak it Tuesday
Wednesdays     Savvy Southern Style
                                           
Thursdays        The Shabby Creek Cottage    No Minimalist Here 
                                     Between Naps on the Porch Tablescape Thursday    
                                     Rustic Restorations Homespun Happenings
Fridays            French Country Cottage       My Romantic Home        Miss Mustard Seed
                                    Potpourri Friday     Common Ground
                                    The Charm of Home    Rooted in Thyme
Saturdays        Funky Junk Interiors

Sunday, September 8, 2013

Rusty Letters and a Modern Masters Rust Finish Tutorial

A while back I showed you a frame I had done in a rusty finish using Modern Masters Metal Effects rust finish products, and I told you how the views of my post were solely my own and that Modern Masters had no idea who I even was let alone that they would compensate me to promote their products.  No one was more shocked than me when I received an email from them and an offer to receive some of their product to try out on my blog.  So I will disclose that this product was supplied to me by Modern Masters but the views of their product are my own.

I did three projects simultaneously with the Metal Effects rust finish so don't let my photos confuse you.  I'll show you the angel I did this week as well.  You can see her in my tutorial photos.

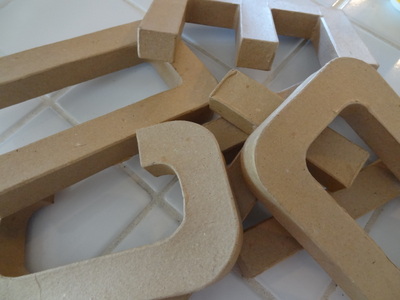
All of us crafters have seen these paper letters.  Our Joann's carries them in a lot of sizes and these that I found at a yard sale are about eight inches tall.
My first step was to use the Metal Effects primer and I gave my projects two coats.  Do the first coat, wait 30 minutes and then do the second coat.  The directions said to let the primer dry for 12 hours but I let it dry for 24 hours.  Please excuse the mess in the background.  I am purging and sorting my entire house right now and things will be worse before they get better.  That will also be the subject of a blog post this week so stay tuned.
After waiting 24 hours for the primer coat to dry, I applied two coats of the Metal Effects iron paint.  I allowed and hour in between each coat.

I let that totally dry for about six hours and then coated my letters with the Metal Effects rust activator.  For the letters I used a sponge applicator and laid the letters flat.  You can spritz the rust activator on, but I wanted a heavier coat and I laid the letters flat so there would be no run off.  For this step, apply the rust activator, wait five minutes and reapply.  Then just sit back and watch the magic begin.  It takes a while but there is definitely a chemical reaction and you will see the rust appear before your eyes.
After my rust appeared (I waited over night to make sure all the rust had come forth), I mixed the Permacoat Supreme, which is a final top coat, with 50 percent water, in other words, half water and half Permacoat.  I applied it with a small chip brush.  When this step dried, I applied the Permacoat full strength.  The label does say Interior/Exterior so I'm sure you could leave your project outdoors, but since my projects were papermache, I intended them for indoor use only.
Since I acquired my letters from a yard sale, I only had a few letters to choose from, but I had a lot of fun making them into words.  
This finish is perfect for fall decorating, don't you think?  I have to say, and this is my sincere opinion, that I have tried about four different product lines from Modern Masters and they all do what they promise to do.  This company knows how to manufacture artist's supplies, and they have been around a very long time.
Thanks for taking a peak and, thank you, Modern Masters, for letting me have loads of fun with your Metal Effects rust finish.  

I may be partying at...

Mondays          Le Chateau des Fleurs       The Graphics Fairy  
                                      Between Naps on the Porch Metamorphosis Monday

Tuesdays          Knick of Time       Coastal Charm  
                                      Boogie Board Cottage    A Stroll Thru Life   
                                     Cozy Little House Tweak it Tuesday
Wednesdays     Savvy Southern Style
                                           
Thursdays        The Shabby Creek Cottage    No Minimalist Here 
                                     Between Naps on the Porch Tablescape Thursday    
                                     Rustic Restorations Homespun Happenings
Fridays            French Country Cottage       My Romantic Home        Miss Mustard Seed
                                    Potpourri Friday     Common Ground
                                    The Charm of Home    Rooted in Thyme
Saturdays        Funky Junk Interiors

Sundays           

Thursday, September 5, 2013

Ladder Style Shelf

I found this cart a couple of months ago and it took me this long to figure out what to do with it.  When I found it, it was in its upright position which you can see in the before photo at the end.  It was so unusual I wasn't going to leave it behind, and besides, the price was right.  It was very tall and the limbs were not joined by hinges but rather flimsy pieces of metal.  I had my husband join the two parts with proper hinges and then he attached hasps to hold them in a locked position should the buyer wish to use this rack in the ladder position.  Here in the first photo I am showing it folded in the middle.
I stenciled it with one of my favorite grain sack stencils from Maison De Stencils, and then I went back in with a liner brush and did some accent strokes to highlight and shade the lettering.
I then sanded the whole thing back to give it a more vintage appearance and wiped some gel stain in the crevices.  If this is used in the upright position, it would be a great display piece for lightweight towels or blankets.  The bottom would be great for magazine storage.
I think it's a very unusual piece, and now I have put my own stamp on it.  Here is the before photo.
Thanks for taking a peak.


I may be partying at...

Mondays          Le Chateau des Fleurs       The Graphics Fairy   
                                      Between Naps on the Porch Metamorphosis Monday

Tuesdays          Knick of Time       Coastal Charm  
                                      Boogie Board Cottage    A Stroll Thru Life   
                                     Cozy Little House Tweak it Tuesday
Wednesdays     Savvy Southern Style
                                           
Thursdays        The Shabby Creek Cottage    No Minimalist Here 
                                     Between Naps on the Porch Tablescape Thursday    
                                     Rustic Restorations Homespun Happenings
Fridays            French Country Cottage       My Romantic Home        Miss Mustard Seed
                                    Potpourri Friday     Common Ground
                                    The Charm of Home    Rooted in Thyme
Saturdays        Funky Junk Interiors

Sundays           

Thursday, August 29, 2013

Trash to Treasure Coffee Table

This is truly a trash to treasure project and an easy one at that.  I took my treadle sewing machine base I found at a yard sale last month and a discarded oak dresser top and married the two.  The result was an adorable definitely repurposed coffee table.
The treadle base was a low one, not the table top height that you normally find.

Remember this sewing machine I found and I dismantled it?  There is the base among the ruins.  It was black and dingy looking.
We painted it white, refinished the dresser top and to make it a little bit taller, my husband added a one-inch piece of plywood between the two parts, screwed it all together and there you have it.
Thanks so much for dropping by.

I may be partying at...


Mondays          Le Chateau des Fleurs       The Graphics Fairy    
                                      Between Naps on the Porch Metamorphosis Monday

Fridays            French Country Cottage       My Romantic Home        Miss Mustard Seed
                                    Common Ground


Wednesday, August 28, 2013

A Trip of a Lifetime

This post could easily be called what I did on my summer vacation, but I think that would be understating the recent vacation my husband and I took to Europe.  This is my third trip to Europe and I must say it far exceeds my first two trips and what I expected from this trip.
This time around we decided to try a river cruise and we sailed down the Danube River and the Rhine River.  We traveled on a Viking River Cruise which held 156 passengers.  The trip started in Budapest and ended in Amsterdam.
We enjoyed the usual sights and smells one would find on this kind of trip such as the incredible pastry shops, the fabulous architecture, the wonderful iron work, but, oh, there was so much more.  I can't tell you how exhilarating it was to go to the dining room for dinner and see swans swimming right up to the window I was sitting at.  There was all kinds of natural wild life indigenous to the area that came right up to our sailing vessel.
When we got to the Rhine River, we came upon castle after castle.  I have never seen anything like it.  One must remember that much of this whole region was bombed during World War II, and it has been rebuilt in such a way that is true to the original architectural charm of centuries past.
The gardens were magnificent as well as the incredible statuary everywhere we went.  I never got tired of seeing it and photographing it.
We also saw a lot of modern art and sculpture which blends perfectly with the old.
I must have photographed over a hundred doors.  Some of these doors are 500 years old and yet they have been preserved and valued over the centuries.
Our cabin steward made us about seven of these amazing towel origami animals.  Isn't this critter so cute?  My first one was a swan that greeted us right after we saw the first swans outside the dining room.
One of our final stops was Kinderdijk in Holland.  We had a great tour of these enormous old windmills that are still functional today.  The entire trip was an immersion in the culture, the land, the history, and, quite frankly, a little bit of heaven.
If you ever have a chance to enjoy a trip like this one, I highly recommend it.  This was not like traveling the big cruise ships.  This was a small group of like minded travelers enjoying a true trip of a lifetime, and Viking made it fun and interesting.  I came home feeling so renewed and energetic and that's what vacations are really for.