skip to main |
skip to sidebar
I missed posting last week because I was feverishly getting ready for The Little French Flea Market last weekend. Although I didn't get to snap photos of my space this time, I thought I would share some of my new projects that I took with me.
One of my fellow dealers at Aubergine Emporium did a grouping of glittered paint brushes which I instantly fell in love with. While it wouldn't be fair to take my version to the shop, I put my own spin on them and took them to the flea market. They were a big hit.
I found this cute wire shelf at a yard sale. It was hot pink and I do mean hot! Ya gotta love those teenage girls and their love of pink. I toned it down with heirloom white and had my husband cut some scrap wood so the shelves were more solid. This went fast too.
I found a new source for some specialty stencils that are very economical and good quality. I will be sharing the source soon. I did a lot of projects from this stencil, but never got them photographed.
I had a stash of tiny old bottles that I attached some simple vintage style labels too. I sold quite a few of these. This whole label thing might be my newest addiction.
My friend gave me some round mirrors. I ran some fabric through the copier to duplicate my bird prints, attached them to a burlap backing and trimmed them out with some black twine. What? You don't have black twine? I spray painted some green twine with flat black paint. Worked like a charm.
One of my followers, 20 North Ora did some cute bottle brush trees with some spools and some tart tins. Here is my spin made with some large wood pieces (you could use wine corks too) and some silver stars and a whole bunch of glitter.
Here are some bird statues I found at another sale. They were a bronzy color. I painted them white and silver and added glitter. These are great for the holidays.
Last but not least is my Paris tray. I did two of these trays in reverse mod podge and I have to say they were a near disaster. In a future post, I will tell you how I turned the negative into a positive. I love the result.
Thanks for visiting. Tomorrow I will share a small wall cabinet that I did. My inspiration was a gift tag of all things.
I may be partying at...
Mondays Le Chateau des Fleurs The Graphics Fairy
Between Naps on the Porch Metamorphosis Monday
Tuesdays Knick of Time Coastal Charm
Boogie Board Cottage A Stroll Thru Life
Cozy Little House Tweak it Tuesday
Wednesdays Savvy Southern Style
Thursdays The Shabby Creek Cottage No Minimalist Here
Between Naps on the Porch Tablescape Thursday
Rustic Restorations Homespun Happenings
Fridays French Country Cottage My Romantic Home Miss Mustard Seed
Potpourri Friday Common Ground
The Charm of Home Rooted in Thyme
Saturdays Funky Junk Interiors
Sundays
A friend of mine found these two identical cabinets that are nice and roomy, but they were as plain as plain could be. I suggested she put a stencil or some kind of design on the fronts of them to perk things up. Her response was that I should put the design and then we would share in the sale. That seemed like a good idea to me so I set about coming up with a design to spruce things up.
This is the first cabinet. I made it a very tall spice cabinet. These cabinets were over three feet tall and both have shelves in them.
I used my old stand by transfer method of reverse mod podge and filled in the empty space with some horizontal stripes. You can see my tutorial on reverse mod podge here. To do the stripes I used Frog Tape. This is my first try with the tape and it worked like a charm. The stripes are crisp and clean, just the way I like them.
All of these images came from the Graphics Fairy, and I printed them in black and white.
You can see the second cabinet here before I decorated it. I finished it yesterday, but I haven't photographed the end result yet. I will share it very soon.
Thanks for your visit. I will have a lot to share because I am getting ready for the Little French Flea Market next weekend and it's also beginning to look a lot like Christmas at Aubergine Emporium as well.
I may be partying at...
Mondays Le Chateau des Fleurs The Graphics Fairy
Between Naps on the Porch Metamorphosis Monday
Fridays French Country Cottage My Romantic Home Miss Mustard Seed
Common Ground
I found this little gem last week at a sale at the very end of the day. As soon as I saw it, I envisioned it in black with burlap. That doesn't happen often, but when something speaks to me that loudly, I listen.
Of course, I didn't think burlap was enough so I put a transfer on it using my Lesley Riley Transfer Artist Paper which I have done my last two posts on. When transferring an image onto fabric, it can't be beat. I used a Graphics Fairy image using a full size page.
Here is the before pic of the way I found this little piece.
Here is a recap of the makeover.
Unscrew seat and remove old yucky fabric.
Paint wood the color of your choice. Cut a piece of burlap and a piece of osnaburg fabric the same size to fit the top of the seat.
First lay down the osnaburg so it is your first layer on your seat cushion and then the burlap. Turn the seat over and staple in place so that the seat has new clean fabric.
Copy an image of your choice using the mirror image setting and transfer it onto a piece of osnaburg that is a little larger so you can create a fringe edge.
Use tacky glue to glue the transferred image to the burlap. I went around the edge of the image and then spread the glue in a grid pattern on the back side of the osnaburg so I got even adhesion to the burlap.
I then tacked the image in the corners with a little baste stitch to keep it secure.
Using the thin grosgrain ribbon I made a border on my transferred image. I glued the ribbon down and in the corners I did a little tack stitch to hold my mitered corner in place.
Next I screwed the seat cushion back on the base, and, voila, I had a new ottoman. This project took no time at all and I love the results.
Thanks for your visit. I am behind on answering email, but I will be getting caught up very soon. Happy Halloween.
I may be partying at...
Mondays Le Chateau des Fleurs The Graphics Fairy
Between Naps on the Porch Metamorphosis Monday
Fridays French Country Cottage My Romantic Home Miss Mustard Seed
Potpourri Friday Common Ground
The Charm of Home Rooted in Thyme
This project could easily be called the project from @!#&. If anything could go wrong, it did. Last week I did a tutorial extolling the virtues of TAP, otherwise, known as Transfer Artist Paper. I love how it transforms my plain towels into a work of art, and somewhere along the way, I know I read that you could use it on furniture and glass. As much as I love TAP, I do not advise using it on furniture. I found a dated 80's jewelry cabinet with an oak finish. I painted it with my Annie Sloan Old White. It was really thick so I thinned it down with water. I thinned it too much and I didn't get good coverage on the second coat.

Oh well, I was going to sand it back anyway. Then I copied an image from the Graphics Fairy onto my TAP paper and attempted to do a transfer onto my wood. I should have stopped after the first transfer, but I was convinced I would get the technique down pat. After all, I'm convinced I read somewhere it could be done. The image bubbled and crystallized and smeared and pretty much frustrated the heck out of me, but I persevered until I got the whole thing done.
Now I'm asking myself why I just didn't switch to a wax paper transfer method, but I'm stubborn like that.
It's really not that difficult to paint these little cabinets. The first coat takes a little patience.
You can see how bad my transfer bubbled and yellowed. Oh yes, it yellowed.
The long and short of it is I won't lose money on this piece but I sure won't make anything on it either. I also believe in sharing my successes and my failures and this was a major flop. Thanks for looking anyway, and stick to designing beautiful towels and fabric items with your TAP and leave the furniture transfers to other tried and true methods.
I may be partying at...
Fridays French Country Cottage My Romantic Home Miss Mustard Seed Common Ground
I'm sure there are lots of tutorials out there on putting transfers on tea towels, but I thought I would share with you some of my thoughts on the process. When I do transfers onto fabric, I use TAP or Transfer Artist Paper by Lesley Riley. I think it's the best iron on transfer paper there is and is very easy to work with. I have some towels I have been using for a year and they stand up to the wash week after week.
I get my TAP on Amazon and my last order was a hundred sheets. Buying in quantity saved me about 25 percent including the shipping. When I use smaller towels, I put two images to one sheet of TAP. This also makes my transfer paper last twice as long. However, if I do flour sack towels which are approximately 32x32, I use a whole sheet of the paper with a full size image.
First select your images. The Graphics Fairy has wonderful images and so does Pinterest. You can find these images on my Pinterest ephemera board. These are particularly good for tea towels because of the subject matter of the images.
For my smaller kitchen towels I use a wider variety of images including livestock and soap.
The beautiful thing about the TAP transfer paper is that you can use an INK JET printer. This is the most common printer a home crafter has. The laser printers are more expensive and if I need a color image especially, I have to go to Fed Ex Office to make my copies.
So first figure out how your copier copies your images. There is a right and a wrong side to the TAP paper. You need to figure out which side of your paper your copier prints on to. You will want your image to print on the white side of the TAP. The reverse side is sort of lavender in color. For the smaller towels, I print two 5x7 images onto one sheet. If you have selected an image with printing, you will want to select the MIRROR image setting. I also darken my print a notch or two so I get a nice strong print.
Look for reasonably priced towels anywhere that sells kitchen or hand towels. I get my flour sack towels at Target. First you will want to cut out any pesky labels like the one below.
I've even transferred onto blue and white tea towels. I get the four packs.
If you are doing the 5x7 image, cut your paper in half so you now have two identical images. Place your image face down on the side of your towel you want to transfer the image on to. I eyeball about an inch above the hem line. I also use a measuring device to make sure the image is centered between the side edges so when the towel is folded it hangs nicely. Make sure your image is facing the right way so you don't end up with an upside down image. Believe me, it can happen. When it does, those are the towels I end up keeping. I call those my test subjects.
I use my hottest iron setting and go back and forth slowly for several seconds. Follow the instructions that come with the TAP. I also use the tip of my iron and go over the corners a few extra times to make sure the image adheres securely. If you start to lift the backing and it is still sticking to your image, just lay the backing back in place and iron some more. This is pretty fool proof. I've never had an image smear. However, don't lay the backing back down if you have removed it all the way. Do it gradually so you make sure the image has come totally away and adhered.

The great thing about the TAP paper is that it's very transparent. You don't get the yellowed contrast like with other transfer papers who shall remain nameless. FYI, I am not being compensated by Lesley Riley in any way. This post is based on my opinion and experience with different transfer papers, and this one just happens to be my go to favorite. Below are both towels that I use. One is a tea towel and the back one is a flour sack.
These towels sell out every time I take them to the flea market. I have now taken to putting them in cellophane bags as they make great hostess gifts, stocking stuffers or just little thank you gifts for teachers or anyone that has done something nice. They are inexpensive to make. I figure the total cost for the little tea towels are approximately $2 each and the flour sack towels are approximately $3 each. That is for the finished product.
Here are my tea towels that I took to the last flea market. I put them in larger cellophane bags, but I think for the upcoming market, I will do something festive and add a cute gift tag and a ribbon.
I hope this cleared up any hesitation you've had about doing transfers onto towels. They are a great project and make great little gifts. One last thing before I leave you. If you are doing a lot of towels at one time, all transfer papers give off odors and it's better to work in an area that is well ventilated. I do about 20 of these at a time and I have them down to five minutes a towel. They are quick and easy to do.
As always, thanks for your visit.
I may be partying at...
Mondays Le Chateau des Fleurs The Graphics Fairy
Between Naps on the Porch Metamorphosis Monday
Tuesdays Knick of Time Coastal Charm
Boogie Board Cottage A Stroll Thru Life
Cozy Little House Tweak it Tuesday
Wednesdays Savvy Southern Style
Thursdays The Shabby Creek Cottage No Minimalist Here
Between Naps on the Porch Tablescape Thursday
Rustic Restorations Homespun Happenings
Fridays French Country Cottage My Romantic Home Miss Mustard Seed
Potpourri Friday Common Ground
The Charm of Home Rooted in Thyme
Saturdays Funky Junk Interiors
I found this cute little table at a local sale. It started life as a Bombay House table so it's not old, but she had great bones so I decided to do a project with her.
First she got a good going over with liquid sand paper to knock the sheen down. Then she got a base coat of a dark taupe brown. I wanted to layer my paints. Next she got two coats of Old Ochre by Annie Sloan followed by French Linen also by Annie Sloan just on her trim.
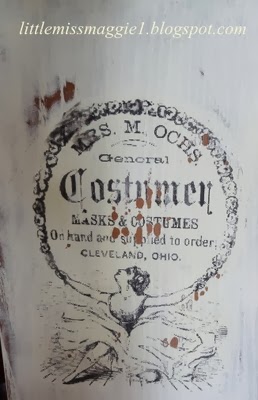
Next I perused Pinterest for some images and documents in the taupe and gray colors. I found this gorgeous cameo and some wonderful old documents from a fashion fair. I even found a label to apply to the back. The old furniture had paper labels affixed and I thought it was a nice finishing touch. To affix my documents and the portrait, I used my favorite transfer method of reverse mod podge. When it was all finished, I sanded her back to give her a distressed antique look and then waxed her with clear wax.
I love how this table turned out. It's a lovely little accent table and is a great neutral piece despite all that it has going on.
It's so fun to transform a piece that has good lines.
She'll be at the next Little French Flea Market in November.
Thanks for your visit.
I may be partying at...
Fridays French Country Cottage My Romantic Home Miss Mustard Seed
Common Ground
I found this adorable drop leaf table last week already painted and prepped and ready to put my mark on it. The color is pretty close to Paris Grey by Annie Sloan.
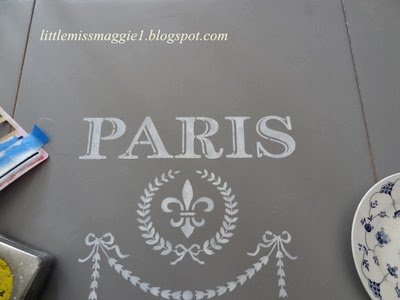
I used one of my Maison de Stencil patterns and centered it on the table with the leaves up. You can find the link for Maison de Stencils on my side bar.
I then used one of my line stencils and made sort of a plaid pattern at the corners and then outlined the whole edge of the table.
I repainted the knobs to match my tabletop design and added a little detail around the rungs of the table legs.
Here is the table top with just the Paris stencil. Still kind of plain Jane.
The warm white details make a nice contrast to the grey and really gives this little piece a lot of personality.
Thanks so much for visiting. Hope you're all having a great week.
You can find me at these parties
Fridays French Country Cottage My Romantic Home Miss Mustard Seed
Common Ground


.jpg)