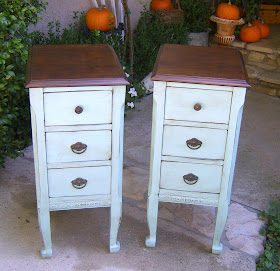
This vanity had bat wing mirrors, and that is probably what lured me in. I have a thing for this type of mirror. The mirror was in great shape. Also the vanity was in very good condition and still had the original hardware. Well, I had the vanity in my space at Aubergine Emporium for about a year and it wasn't getting much interest. By the time I put two lamps on it, that took all the surface space it had. So I thought it was time for a re-do.
I brought her home and told my husband to get to work. He carefully removed the mirror which I still have. Does anyone have any ideas for that? Off to work I went leaving this piece in Steve's capable hands, or so I thought.
I returned home and there sat the vanity intact. Notice anything? I have never had this happen on the other similar projects we have tackled. This vanity only had six legs. When he tried to separate them, the sides would not stand on their own. Off to Lowe's he went looking for leg material. He measured the legs so they could be duplicated. Thankfully this piece did not have any curves to the back legs so it was a relatively easy fix. He drilled three dowel holes in each new leg and dowled it into the vanity for extra strength. I probably would have used L-brackets, but since Steve is a perfectionist he explained to me he was doing it the "right way."
We left the tops in wood. because they were in great shape. However, the wood finish on the bottom wasn't doing much for me and this is not necessarily an antique vanity, although it is certainly vintage. I decided the two new night tables needed a little paint. Now when you separate a vanity like that and remove the shelf in the middle, it leaves either marks or grooves in the sides where the shelf was attached. Notice on the table on the left the molding is on the bottom. That was original to the vanity. That was the outside. On the night table on the left where the groove was left from removing the shelf, Steve matched the molding as closely as he could and placed it over the groove and holes left from removing the shelf. Once it was all painted, you can't even tell.
After painting the two halves, I shabbied them back with my Mouse Sander just a bit to add a little age and put a light coat of Minwax Jacobean stain and then wiped it back quickly. I just wanted to add a little patina. We re-installed the original hardware and now I have something I hope will be more practical.
I hope I can get the link to Miss Mustard Seed's Link Party on Friday, December 2. If I cannot copy the link, here is the link to her blog http://missmustardseed.com/. Thank you, Miss Mustard Seed, for hosting you Furniture Friday Link Party!


To each his own, but for me...you ruined a nice piece of furniture.
ReplyDeleteI *just* found a destroyed vanity similar to the one you used. I'm so excited to turn it into my own version of this!!
ReplyDeleteThanks for the photos.