Saturday, November 3, 2012

Reverse Mod Podge Picture Tutorial

A couple weeks ago I showed you my Paris Tea Cart that I did a reverse mod podge treatment on, but I did not do a photo tutorial.  As promised, here it is.  I warn you there are a lot of photos illustrating each step.  While it seems like a lot of work, and it is, it's much faster than hand painting and I love this process because I can mix it up with my lettering and stenciling.  It's inexpensive and you get a big pay off for your time.  This is a large caddy that I painted red and then I came back in with Annie Sloan Old Ochre to put a white box on each side of the caddy.  I forgot to seal the Old Ochre with a clear coat, but it really didn't matter.  The chalk paint was unaffected by all the water that was applied to it.

First of all you need a laser copy.  So select your image and if there is text, be sure to reverse your image (mirror image).  I stop at the Office Depot or Fed Ex office store and do it on their copy machine.  You can enlarge it if you need to, and my Fed Ex office store let's me Email them my image and if I need to stretch it out, etc., they will use Photoshop and do it for me at no extra charge.

So now your image is copied.  Cut it close to your image and paint mod podge on the image itself.  Now place it face down on your piece like I did in the following photo.
 
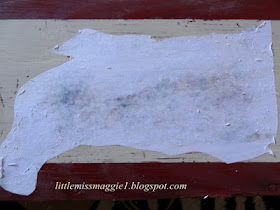
 I always let mine dry overnight but at the minimum it's recommended you let it sit for six hours.  Now to expose your image.  Wet a wash cloth.  You don't even need to wring it out.  It can be sopping wet.  Wet your paper and start rubbing in a circular motion.  For little projects, use your fingertips.  For these larger projects, I use four flat fingers and rub in a circular motion.  I took a photo of my hand to show you later.  I am doing a four-sided project so my photos sort of jump around but here is each step.  This is what the wet image looks like after I have rubbed it and it's still wet.  You can see the image underneath.  Now walk away and let it dry.


 Now that that is dry, I am returning to find this dry paper that has been rubbed back for the first time.  See how the paper dries and your image is no longer revealed?
 Now repeat the wet washcloth and the rubbing procedure.  The next photo is the paper after I have re-wet it but have not rubbed it again.
 Now I have rubbed the paper and it is still wet.  See how much more of the image you can see?
 I just went around the project and although I took different angles for my photos, this is illustrating how each step looks.  So now that I let the last step dry, I am returning to what looks like this.  You can see the whole image but there is lots of paper remaining.  So re-wet the image  and start massaging again.
 See how each process of doing the same step reveals more and more of the image and there is less and less paper?  You can still see plenty of paper bits on the image, but notice how the cracks are being revealed to give this a perfectly aged look?
 Let it dry again and then repeat.  As the paper layer gets thinner and thinner it dries very fast.  The following photo is my fingers placed on the image and I move them around in a circle to massage gently.
 Here is the final step of the wetting process.  I wet it again and then massage the final bits of paper off.  You can see in the following photo how little paper is left.  I do this wetting process five times.
 After that last step has dried, this is what is left.  A totally smooth, totally transferred image.  If you feel any little paper particles at this point, you can go over it with really fine sand paper.  Do this gently and it will not remove the image.  At this point spray it with a clear coat of your choice or whatever you like to seal your projects with. 
I am not done with this caddy yet.  I want to go back in and do some borders and some printing  When it is finished, I will show you the whole thing.  My suggestion to you, if you want to try this, is to practice on some inexpensive flower pots like my Paris pots you can see here.  You'll get the hang of it in no time.  Happy crafting everyone and thanks for enduring this long drawn out tutorial, but as it's always been said a picture is worth a thousand words.

I'm partying at...


Mondays          Le Chateau des Fleurs       The Graphics Fairy    
                                      Between Naps on the Porch Metamorphosis Monday
Tuesdays          Knick of Time       Coastal Charm  
                                      Boogie Board Cottage    A Stroll Thru Life   
                                     Cozy Little House Tweak it Tuesday
Wednesdays     Savvy Southern Style
                                           
Thursdays        The Shabby Creek Cottage    No Minimalist Here 
                                     Between Naps on the Porch Tablescape Thursday    
                                     Rustic Restorations Homespun Happenings
Fridays            French Country Cottage       My Romantic Home        Miss Mustard Seed
                                    Potpourri Friday     Common Ground
                                    The Charm of Home    Rooted in Thyme
Saturdays        Funky Junk Interiors

Sundays           My 1928 Charmer Sunday's Best


Thursday, November 1, 2012

Autumn Wreaths

A couple of months ago I found two fall wreaths at a yard sale for $2 each.  The only problem was they were...well, not so attractive.  But as they say, they had good bones.  Since my daughter is coming down for Thanksgiving, I want the front porch to look welcoming and festive so I took my cheapy wreaths and looked around in my stash and spruced them up a bit.  We have double entry doors so the pair will work out great.

 The next photo is what I started with.  The fake berries were faded and turned to pink.  Some of the foliage just looked like dead weeds after years of use.  So I snipped off all the uglies, and dug out a couple of fall garlands I had used at the shop in past years and started snipping and tucking.
 I still needed a little more filler so I found some dried pods that had not been used in the project I purchased them for and I also had these gorgeous feathers.  I snipped off the long stems, tucked here and tucked there and now I have something much more welcoming for the entry.
Thanks for visiting.  I love it when you drop in.

I'm partying at...


Mondays          Le Chateau des Fleurs       The Graphics Fairy    
                                      Between Naps on the Porch Metamorphosis Monday
Tuesdays          Knick of Time       Coastal Charm  
                                      Boogie Board Cottage    A Stroll Thru Life   
                                     Cozy Little House Tweak it Tuesday
Wednesdays     Savvy Southern Style
                                           
Thursdays        The Shabby Creek Cottage    No Minimalist Here 
                                     Between Naps on the Porch Tablescape Thursday    
                                     Rustic Restorations Homespun Happenings
Fridays            French Country Cottage       My Romantic Home        Miss Mustard Seed
                                    Potpourri Friday     Common Ground
                                    The Charm of Home    Rooted in Thyme
Saturdays        Funky Junk Interiors

Sundays           My 1928 Charmer Sunday's Best


Wednesday, October 31, 2012

Poodle Skirt Style Table Topper

Happy Halloween everyone, and I hope all of you on the east coast are safe and sound and have not been too badly affected by Sandy. 

Since today is Halloween, what better day to debut my table topper dressed up like a poodle skirt!

I guess it's a little late to tell you that felt right now is as cheap as it gets because of all the costumes being made, but maybe it will stay inexpensive through Christmas.   Felt yardage is extremely wide so figure out how big you want your table topper to be (mine was for a 36 inch round table).  I added whatever drop I wanted for the sides and then cut the fabric into a circle.  For the poodles I used a poodle applique I have had for years as my pattern and cut out the number of poodles I needed.  I added a little pom pom for the nose and a large pom pom to embellish the tail.  I had the pink rhinestones on hand or you could use sequins too for the collar.  Don't forget the eyes as well.  Glue them like I did and then attach them to your felt circle.  Very easy project.  I used Tacky Glue for the whole project.  This table topper is part of a bigger blog post I will be doing, but I'm not ready to share that yet. 
I think this would be so cute in a little girl's room done in a Paris theme.  You could do pillows, a throw, lamp shades.  Let your imagination go wild!  As always, thanks for visiting. 

I'm partying at...


Mondays          Le Chateau des Fleurs       The Graphics Fairy    
                                      Between Naps on the Porch Metamorphosis Monday
Tuesdays          Knick of Time       Coastal Charm  
                                      Boogie Board Cottage    A Stroll Thru Life   
                                     Cozy Little House Tweak it Tuesday
Wednesdays     Savvy Southern Style
                                           
Thursdays        The Shabby Creek Cottage    No Minimalist Here 
                                     Between Naps on the Porch Tablescape Thursday    
                                     Rustic Restorations Homespun Happenings
Fridays            French Country Cottage       My Romantic Home        Miss Mustard Seed
                                    Potpourri Friday     Common Ground
                                    The Charm of Home    Rooted in Thyme
Saturdays        Funky Junk Interiors

Sundays           My 1928 Charmer Sunday's Best


Tuesday, October 30, 2012

Beautiful Napa

As I told you yesterday we spent the weekend in Napa Valley, California with my daughter and son-in-law.  I managed to high jack upload some photos from my daughter's camera to share with you.  She has a much better camera and is a much better photographer than I am.  I will just let you enjoy the majestic scenery of this incredible place.


Thanks for visiting.  Hope you enjoyed the fall foliage.

I'm partying at...


Mondays          Le Chateau des Fleurs       The Graphics Fairy    
                                      Between Naps on the Porch Metamorphosis Monday
Tuesdays          Knick of Time       Coastal Charm  
                                      Boogie Board Cottage    A Stroll Thru Life   
                                     Cozy Little House Tweak it Tuesday
Wednesdays     Savvy Southern Style
                                           
Thursdays        The Shabby Creek Cottage    No Minimalist Here 
                                     Between Naps on the Porch Tablescape Thursday    
                                     Rustic Restorations Homespun Happenings
Fridays            French Country Cottage       My Romantic Home        Miss Mustard Seed
                                    Potpourri Friday     Common Ground
                                    The Charm of Home    Rooted in Thyme
Saturdays        Funky Junk Interiors

Sundays           My 1928 Charmer Sunday's Best


Monday, October 29, 2012

Napa Valley in the Fall

This past weekend we drove up to Napa Valley, California to cheer my daughter and her husband on in a run they were participating in.  They dressed for the occasion.  Aren't they a handsome couple?

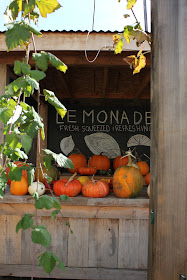
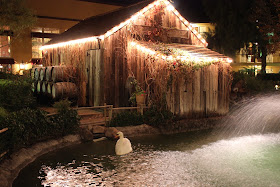
 Some of the wineries put out fabulous fall decorations.  We stopped at one of them just to photograph their beautiful fountain and pumpkins.
 
 I love arched doors and this one really got my attention.  We actually got to enjoy a lot of fall foliage on this trip.
 Many of the vines still had grapes on them.  It's getting to be the end of the harvest this year.
 I love the vines on this building.  Aren't the colors gorgeous?  I know this is nothing new to you in the east, but our seasons are not as distinct here in California.  We don't get that much change in our colors in the fall here.  This area is about 400 miles north of where we live and they do get more of a seasonal change than we do in the Los Angeles area.
 This was the Coppola Winery owned by Francis Ford Coppola.  The whole estate was breathtaking.
Here is the front of the estate where they host the wine tastings.
 Unlike many of the wineries, this one's vineyards are part of the estate.  They not only grow their own grapes but their winery is on the property as well.  We had a fabulous weekend and a wonderful visit with our daughter and son-in-law.  Thanks for visiting.

I'm partying at...


Mondays          Le Chateau des Fleurs       The Graphics Fairy    
                                      Between Naps on the Porch Metamorphosis Monday
Tuesdays          Knick of Time       Coastal Charm  
                                      Boogie Board Cottage    A Stroll Thru Life   
                                     Cozy Little House Tweak it Tuesday
Wednesdays     Savvy Southern Style
                                           
Thursdays        The Shabby Creek Cottage    No Minimalist Here 
                                     Between Naps on the Porch Tablescape Thursday    
                                     Rustic Restorations Homespun Happenings
Fridays            French Country Cottage       My Romantic Home        Miss Mustard Seed
                                    Potpourri Friday     Common Ground
                                    The Charm of Home    Rooted in Thyme
Saturdays        Funky Junk Interiors

Sundays           My 1928 Charmer Sunday's Best

Sunday, October 28, 2012

Halloween Tea

We are spending the weekend with my daughter and son-in-law this weekend and catching up on missed time together, but I thought I would do my final post on Sue's tea from last Wednesday.  I shared her fabulous Halloween decor already except for this wonderful table she set for us.  Isn't this fun?

We all got our Best Witch award pins.  I love her mixture of the black and white china.  It all blended so well together.  There were lots of crows and the black roses were perfect for the occasion.
 The spider web lace was the perfect table runner.
 There were seven of us for tea and we had a lovely afternoon.
This six pack of sodas was a hostess gift from one of the guests.  I love the idea and I wish I would have photographed the individual labels on each bottle but I forgot. 
 This was just a regular carton of sodas but the labels that were applied were wild.  What a clever idea.  Thanks for visiting.  I'm sure you're brewing up your very own Halloween feast as well.

I'm partying at...


Mondays          Le Chateau des Fleurs       The Graphics Fairy    
                                      Between Naps on the Porch Metamorphosis Monday
Tuesdays          Knick of Time       Coastal Charm  
                                      Boogie Board Cottage    A Stroll Thru Life   
                                     Cozy Little House Tweak it Tuesday
Wednesdays     Savvy Southern Style
                                           
Thursdays        The Shabby Creek Cottage    No Minimalist Here 
                                     Between Naps on the Porch Tablescape Thursday    
                                     Rustic Restorations Homespun Happenings
Fridays            French Country Cottage       My Romantic Home        Miss Mustard Seed
                                    Potpourri Friday     Common Ground
                                    The Charm of Home    Rooted in Thyme
Saturdays        Funky Junk Interiors

Sundays           My 1928 Charmer Sunday's Best